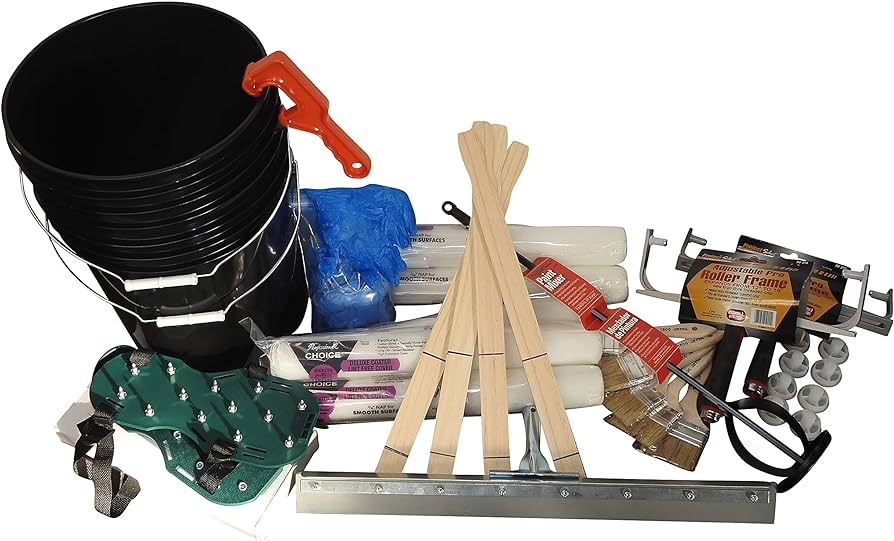
The Ultimate Guide to Epoxy Flooring Installation Tools
Epoxy flooring systems have become a popular choice for both commercial and residential spaces, offering durability, longevity, and aesthetic appeal. Whether you're a DIY enthusiast ready to take on your next home improvement project or a professional contractor, having the right tools is crucial for a successful epoxy floor installation. This comprehensive guide will walk you through the essential tools needed to achieve a flawless finish.
Preparing the Surface: The Foundation of Success for DIY Epoxy
The Importance of Surface Preparation:
Before diving into the application process, it's paramount to understand the role of surface preparation in epoxy flooring. A well-prepared surface ensures that the epoxy coating adheres properly, leading to a smooth, durable, long-lasting finish.
Concrete Grinder: The First Step
- Tool Description: A concrete grinder is essential for smoothing out the floor and removing any imperfections or previous coatings. This tool is key to achieving a clean, porous surface that the epoxy can bond to effectively.
- Usage: Use the grinder to carefully remove the top layer of the concrete, ensuring an even, textured surface.
Brooms, Vacuums and Rollers: For Cleaning and Priming
- Why They Matter: After grinding, it's important to remove all dust and debris from the surface. Stiff-bristled brushes and smaller rollers can be used for applying primer, which improves the epoxy's adhesion to the concrete.
Mixing the Epoxy: Precision Leads to Perfection
The Art of Mixing Epoxy:
Epoxy flooring comes in two parts that need to be mixed thoroughly before application. Achieving the right consistency is crucial for a uniform finish.
Mixing Paddles and Buckets
- Mixing Paddles: These are designed to attach to a standard drill, allowing for a consistent and thorough mix of the epoxy components.
- Buckets: Heavy-duty mixing buckets are necessary for combining the epoxy resin and hardener. Ensure you have buckets that are clean and free from contaminants.
Applying the Epoxy: Tools for a Smooth Application
The Journey to a Flawless Floor:
Applying epoxy can be challenging, but with the right tools, you can ensure a smooth, even coating.
Rollers: Your Main Allies
- 18" 3/8 Nap Rollers: These rollers are perfect for applying epoxy over large surfaces. Their size and nap thickness allow for an even distribution of the coating, minimizing air bubbles and ensuring a smooth finish.
- 4" Rollers: Ideal for smaller areas and edges where precision is key. These rollers can help achieve a consistent thickness around the perimeter of the room.
Squeegees: For an Even Coat
- Flat Blade Rubber Squeegees: A crucial tool for spreading epoxy, especially in larger areas. The squeegee helps in laying down an even layer of epoxy before it is backrolled, which is essential for a uniform coat.
The Finishing Touches: Detailing and Safety
Ensuring a Perfect Finish:
Detailing and safety are paramount in the final stages of epoxy floor installation. Proper tools not only contribute to the aesthetic but also ensure the installer's safety.
Spiked Shoes: A Necessity for Detailing
- Why You Need Them: Spiked shoes allow you to walk over the epoxy coating without leaving marks, enabling you to manage and detail the application as it's being laid down.
- Application: They are especially useful for popping air bubbles and ensuring the coating reaches every corner of the floor.
Additional Tools You Might Find Helpful: For the Finishing Touches
- Edge Brushes: Small brushes are essential for touching up edges and hard-to-reach areas, ensuring the entire surface is coated evenly.
- Safety Gear: Always wear protective clothing, gloves, and eyewear when handling and applying epoxy to safeguard against spills and splashes.
Wrapping Up: Your Path to Epoxy Flooring Mastery
Epoxy flooring installation is a meticulous process that demands precision, patience, and the right set of tools. From surface preparation with concrete grinders to the detailed application with rollers and squeegees, each step plays a crucial role in achieving a durable and visually appealing floor. Spiked shoes and mixing paddles ensure both the application's efficiency and the installer's safety, while the right cleaning tools guarantee a clean, primed surface ready for the epoxy coating.
For DIY Enthusiasts and Professional Contractors Alike
Whether you're tackling a project at home or handling a commercial installation, understanding the importance of each tool and its proper use can make a significant difference in the outcome of your epoxy floor project. High-quality tools contribute to the longevity and beauty of the floor, making it a worthwhile investment for any space.
Epoxy Plus: Your Partner in Flooring Excellence
If you're looking to embark on an epoxy flooring project, consider consulting with professionals like Epoxy Plus. Our expertise in floor coating solutions ensures that every project you undertake is executed with precision and care. We not only provide high-quality materials but also offer guidance and support to ensure your epoxy floor installation is a success.
Start Your Epoxy Flooring Project with Confidence
Armed with the right information and tools, you're now ready to begin your epoxy flooring project. Whether you're a seasoned contractor or a DIY enthusiast eager to transform your space, remember that the success of your project lies in the preparation, the precision in mixing, and the care in application. Every tool, from the grinder that preps your surface to the spiked shoes that allow for detailed work, plays a pivotal role in achieving that flawless finish.
Trust in Quality: Choose Epoxy Plus
For those looking for professional assistance or quality materials for their next project, Epoxy Plus is here to help. Our range of epoxy flooring solutions is designed to meet the highest standards of durability, aesthetics, and performance. Contact us today to learn more about how we can help bring your vision to life with the perfect epoxy floor.
The Path to Perfection
Remember, the beauty and longevity of your epoxy floor depend on the quality of both the materials and the tools used. Investing in the right tools and taking the time to properly prepare and apply your epoxy will result in a floor that not only looks stunning but also stands the test of time.
A Final Note
In conclusion, embarking on a flooring project, especially when installing epoxy floor coatings, requires a comprehensive selection of tools and accessories to ensure success. From the initial prep work with a floor grinder to the thorough application process, every epoxy project in settings like your garage becomes much easier with the right tools at your disposal. Whether you’re working on a custom installation or applying epoxy in a standard area, tools such as vacuum systems, trowels, heavy-duty mixers, and sanders are indispensable. For DIY enthusiasts and professional flooring installers alike, having a good selection of paint rollers, buckets, extension poles, and, for more intricate work, metallic effects tools like trowels and squeegees, make things considerably more efficient.
Understanding the tools needed, from the basic paintbrush for detailed edges to dual cartridge sealers for high-grade finishes, is crucial. If you’re diving into a project that requires applying epoxy with precision, consider investing in or renting tools like a heavy-duty floor sander, diamond disc-equipped floor grinders, and scrapers to remove unwanted residues. A high-quality vacuum, along with disposable items for cleanup, makes post-installation cleanup a breeze. For those mixing resins or working with bulk materials, a sturdy mixer, gallon measures, and a variety of paddles ensure a consistent and bubble-free mix.
For every epoxy installer, tools such as a heat gun for removing air bubbles, an electrical mixer for a thorough mix, and extension poles for reaching across wide surfaces are invaluable. Not to mention, specialized equipment like a diamond sander and a metal trowel can take your project to the next level, particularly with decorative or metallic epoxy applications. And let's not forget, for the DIY crowd, leveraging resources like our YouTube channel: BEST FLAKE EPOXY GARAGE FLOOR FOR YOUR CAR (youtube.com) can provide invaluable visual guides and transcripts that detail the installation process step by step.
At Epoxy Plus, we’ve got you covered with a versatile selection of epoxy flooring tools and accessories suitable for different types of projects. Whether it’s a heavy-duty job requiring custom tools or a standard garage floor coating, our range is designed to make your hard work yield flawless results. With the right tools, applying epoxy becomes an achievable task, enabling you to achieve that professional finish. Remember, for every stage of your epoxy flooring project, from the initial grind to the final sealer application, choosing the right tools not only makes the installation process smoother but also ensures a durable and visually appealing finish. Check out the tools available here: Essential Epoxy Installation Tools for Flooring Projects (epoxyplus.com)